Operating the Unity6
Global Settings, Programming, Press Actions, and Message Types
- Global Settings
- Programming Via the Touchscreen
- Press Actions
- Expression Pedals
- UniPorts
- Chromatic Tuner
- Expression to Volume
- Copy | Paste | Swap
- Factory Reset
- Global BPM
Global Settings
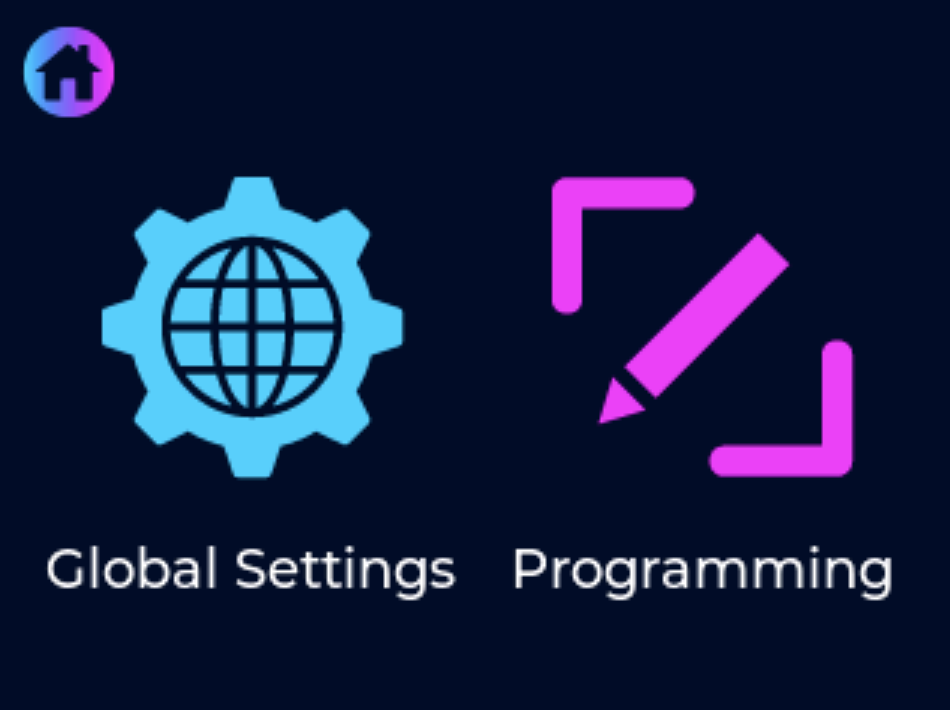
Global settings is where you can access any of the features that are global to all banks on the Unity6. To access the Global Settings, simply press the middle of the Home Screen then press the Global Settings icon (shown below).
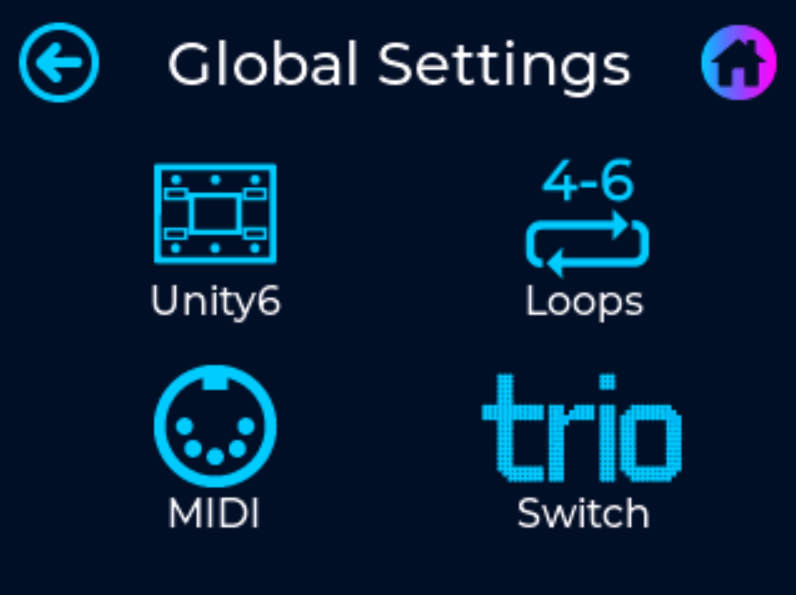
Once inside the Global Settings Menu you can choose between the followings settings:
- Unity6 - select to access the global settings for general Unity6 features
- Loops - select to access the global settings for the 6 loops within the Unity6
- MIDI - select to access the global settings for general midi features
- Trio - select to program the u6 Trio switch extender. For detailed information on Trio programming go here
Unity6 Global Settings
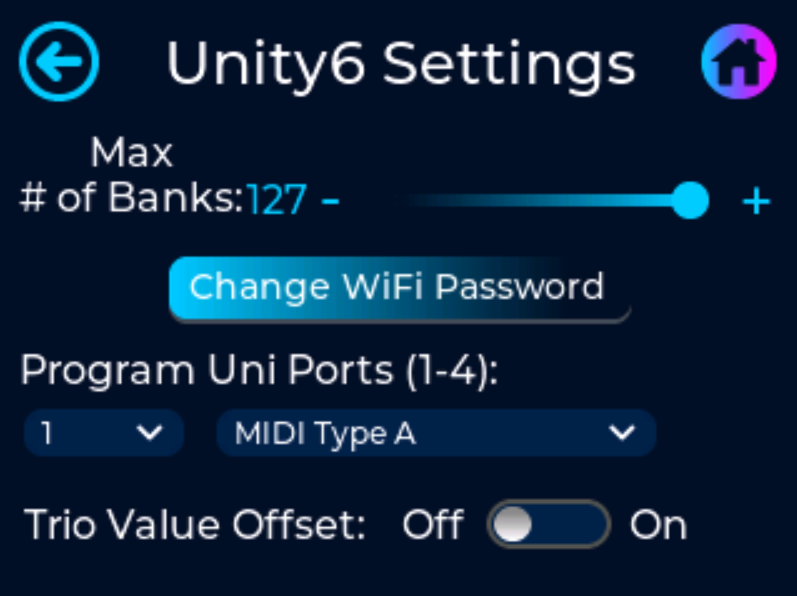
- Max Number of Banks
- This is where you can select the maximum number of banks the pedal will scroll though when using the footswitches. This only affects the number of banks when scrolling using the footswitches. You can always use a message type to jump to any bank outside of this limit.
- Change WiFi Password
- Select to change the WiFi password stored within the Unity6. Follow the on screen prompts to successfully change the password.
* Default password from the factory is '12345678'
* New password must be at least 8 characters long
- Select to change the WiFi password stored within the Unity6. Follow the on screen prompts to successfully change the password.
- Program Uni Ports
- This sets the functionality for each Uni Port 1 thru 4. See here for the complete list of functionality for each UniPort
Loops Global Settings
Used to name each individual loop and to activate loops 4 thru 6. If any of these are not activated, assigning a message to a preset to turn any of these loops on/off will not work.
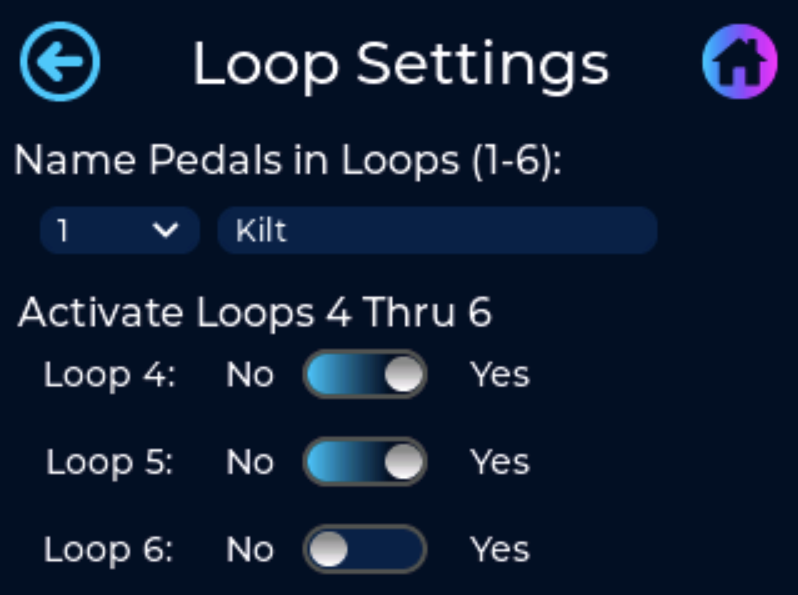
- Assign Pedals to MIDI Channels
- Select the loop number and press the text box to name the pedal that is wired in the corresponding loop. There is a 12 character limit when naming your loop
MIDI Global Settings
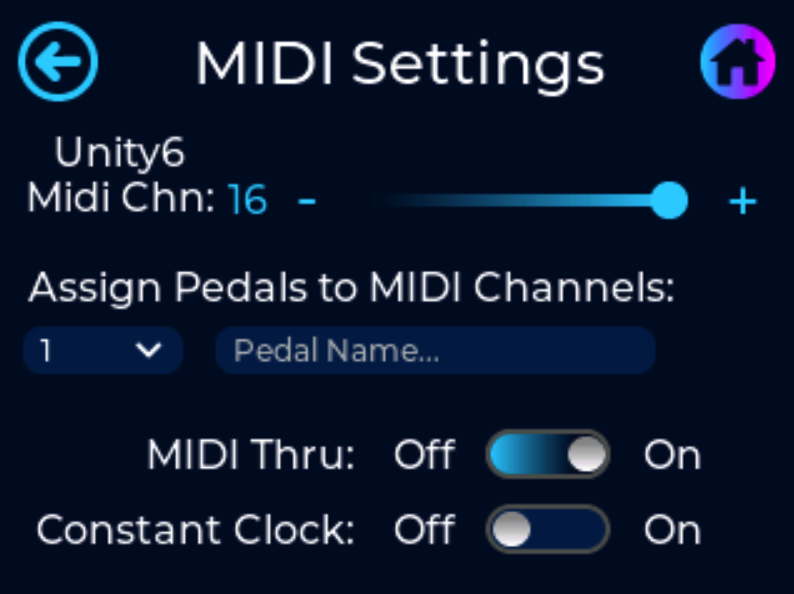
- Unity6 MIDI Channel
- Select the MIDI channel that the Unity6 will respond/listen to when receiving MIDI messages from external devices such as other MIDI controllers or via Bluetooth.
- Assign Pedals to MIDI Channels
- Select the MIDI channel and press the text box to name the pedal programmed to its corresponding MIDI channel. There is a 16 character limit when naming your pedal
- MIDI Thru
- Turning MIDI Thru on will pass all incoming MIDI messages, received at the MIDI Input jack, though to the MIDI Output jack. If this feature is turned on AND you have created a complete loop with your MIDI chain, this will create an infinite MIDI loop and will lock up your pedal.
- Constant Clock
- Turning on Constant Clock will make the Unity6 continuously send a MIDI clock pulse. This is required if using any pedal that requires a consistent MIDI clock signal, like the HX Stomp.
- Turning off Constant Clock will make the Unity6 send MIDI clock for 3 seconds (long enough to sync all of your pedals) and then stop sending the clock pulse. Every time the BPM is changed on the Unity6 the clock pulse will send for 3 seconds and then stop again. This feature is useful if your pedalboard/wiring is bleeding clock signal into your audio path and can reduce/eliminate the added noise.
Programming Via the Touchscreen
Programming the Unity6 using the touchscreen.
One of the first things you may notice about the Unity6 is that there is not a "Save" button anywhere inside our user interface. We've designed it this way to streamline the way MIDI programming is done and now you will never have to hook your controller up to a computer as everything you do inside the Unity6 is automatically saved and stored into permanent memory.
First press the center of the home screen to access the menu system then select the Programming icon.
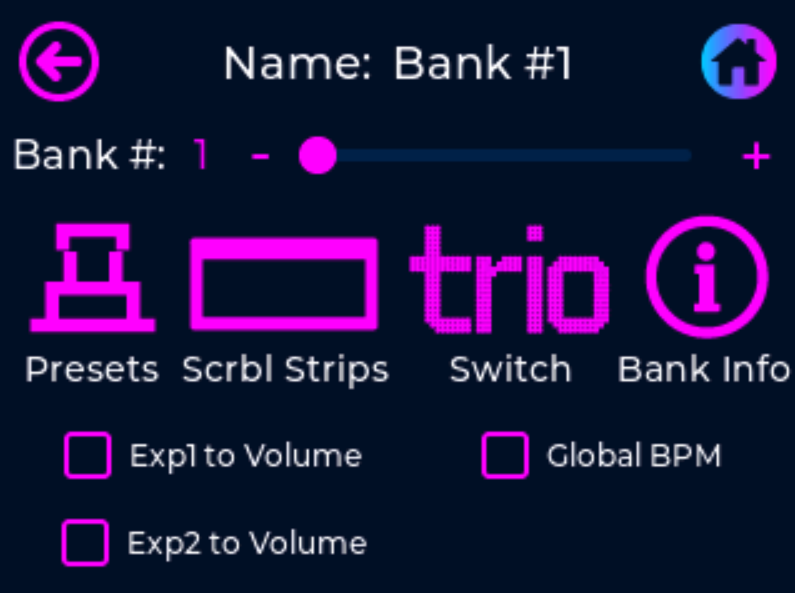
From here you have 7 options for programming presets and setting Bank Information:
-
-
- Programming Switches - use for assigning MIDI messages to switches/presets
- Scribble Strips - use for assigning scribble strip info, like default name, toggle name, and color
- u6 Trio - use for programming additional presets assigned to the u6 Trio. More info on Trio programming can be found here.
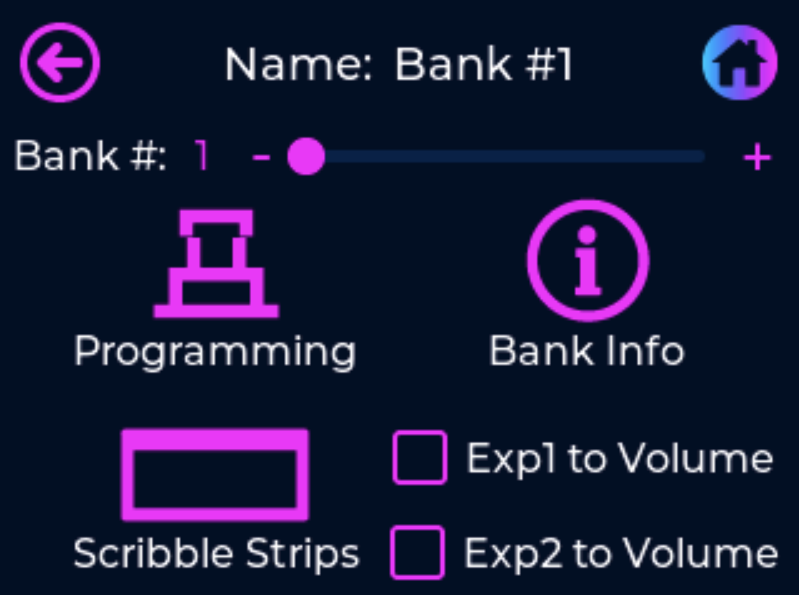
- Edit Bank Info - use for naming the preset, setting BPM, naming EXP1 & EXP2, etc.
- Exp1 to Volume - select for using an expression pedal as a volume pedal that is plugged into UniPort #1
- Exp2 to Volume - select for using an expression pedal as a volume pedal that is plugged into UniPort #2
- Global BPM - selecting this checkbox will make the currently selected bank ignore any BPM information stored within the Bank Info screen, making the bank essentially act as a global bpm. When navigating to this bank the BPM will not change from the info stored in the previously selected bank or previously entered tap tempo value.
-
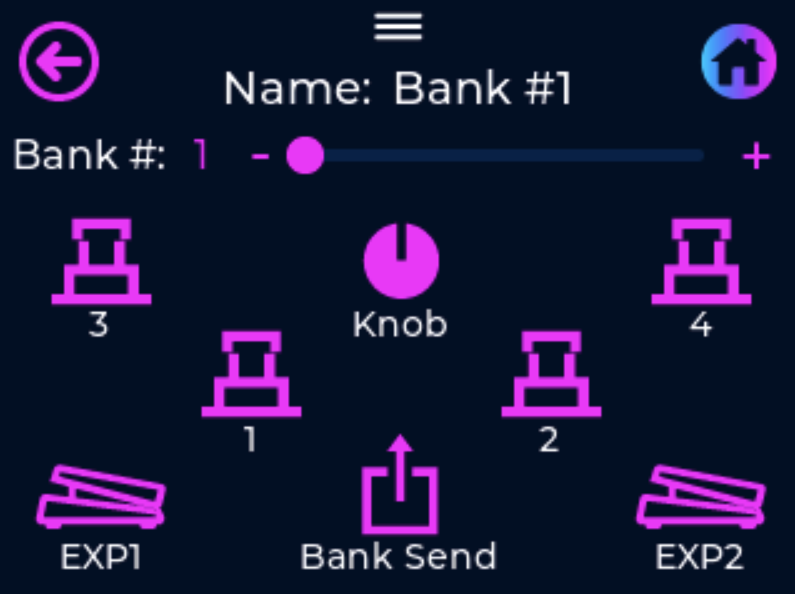
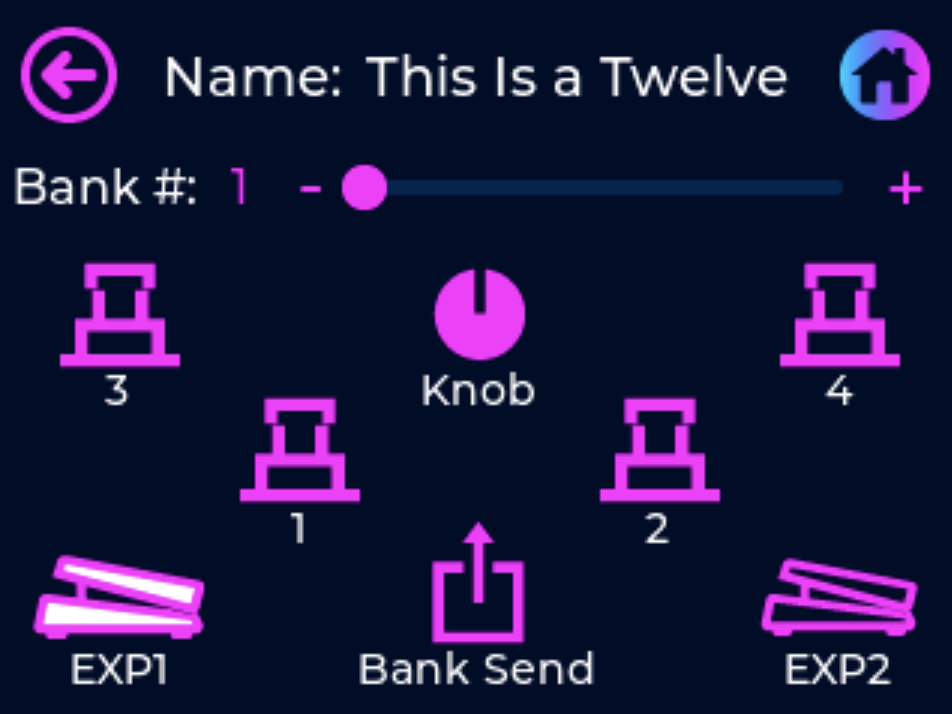
Programming Switches Screen:
-
-
- Select the Bank Send icon to program any messages that will be sent upon loading the bank
- Select the EXP1 or EXP2 icons to program any messages that will be sent using the expression pedals
- Select any Switch icon or the BPM Knob icon to program the messages that will be sent with each preset
-
Lets have a look at programming a preset tied to any switch. First press the Switch icon that you want to program and you will taken to the following programming screen.
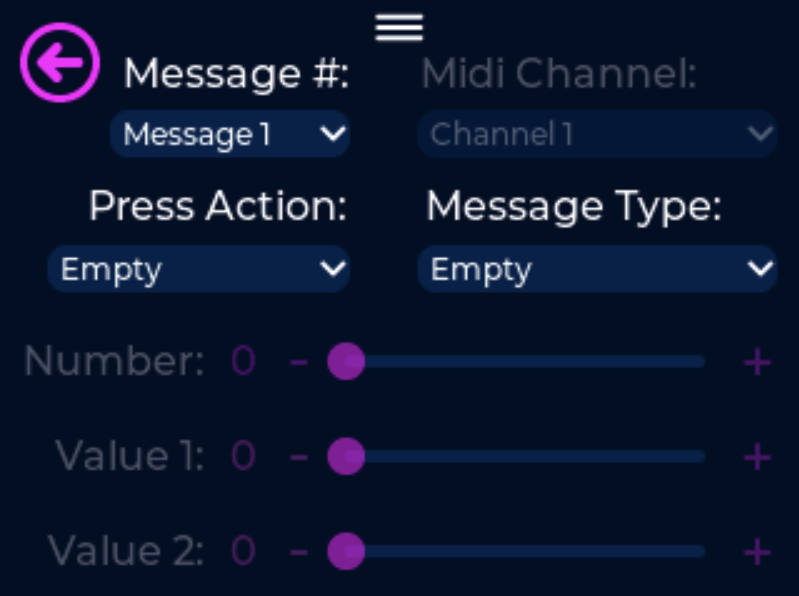
Select from any of the 32 Message #'s available, select your Press Action (more on Press Action's here), select the Message Type (more on Message Type's here). Then fill in the required info, MIDI Channel, Number, Value, etc.
To continue adding additional MIDI messages to this preset, simply select a new Message # from the dropdown list and continue the process listed above.
Pressing the Back Arrow icon will take you back to the previous screen or pressing the Home icon will exit you from the menu system.
Added in v2.3.0 is the ability to see all of your messages that have programming assigned by doing a long press on the Message # dropdown menu. An example of this is seen in the picture below.
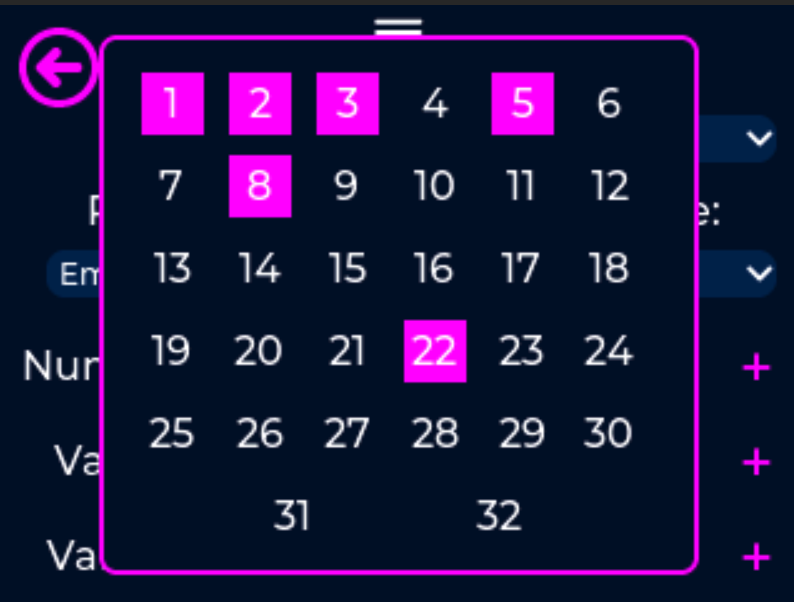
Remember there is no need to save any messages you have created, everything is automatically saved in permanent memory as you progress through the programming process.
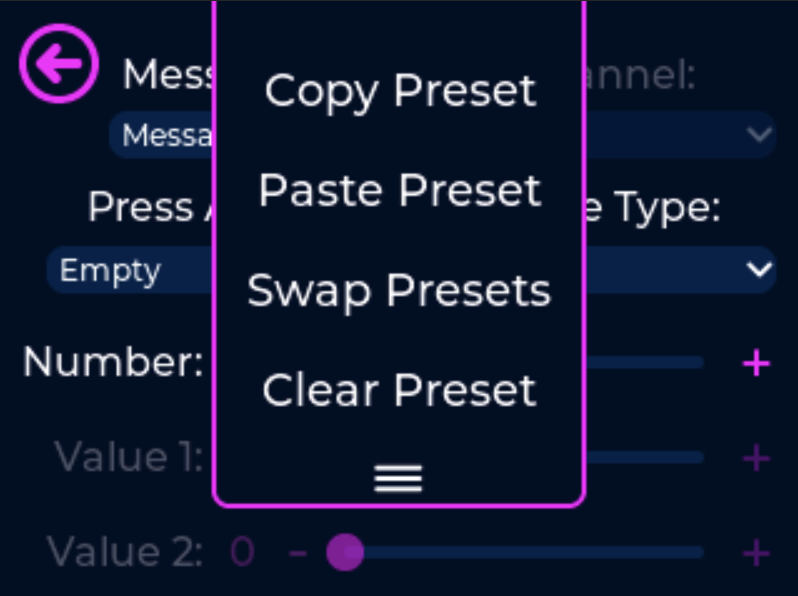
To clear a preset, either press the "hamburger" icon or click the BPM knob to access the dropdown menu. Press the touchscreen or use the BPM knob to select the Clear Preset menu item.
Scribble Strip
Press the Scribble Strips icon to make any adjustments to the scribble strips and you will be taken to the following programming screen.
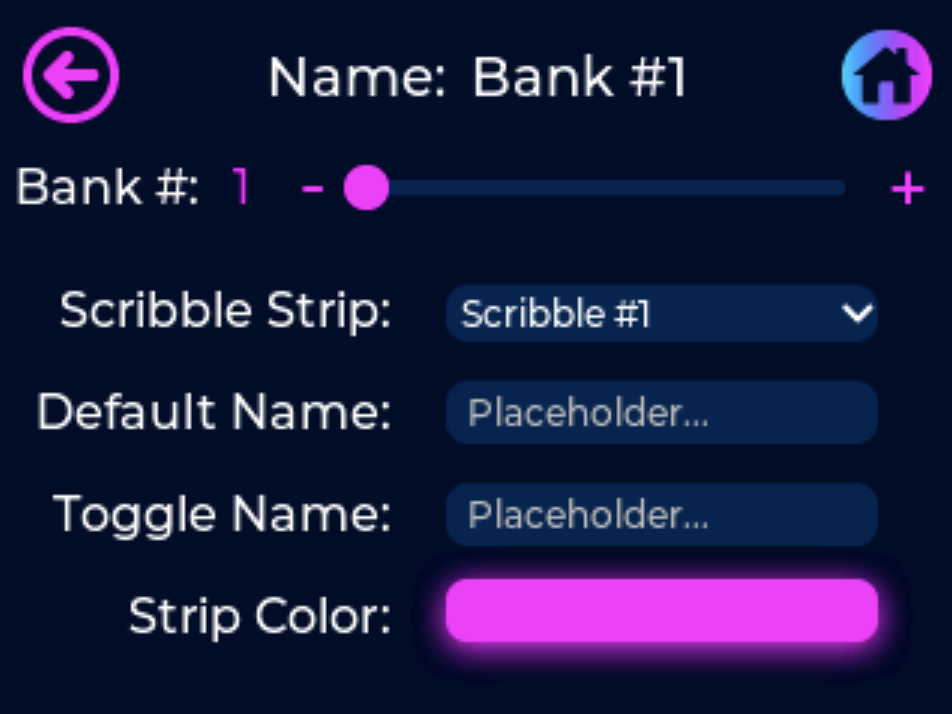
First make sure the scribble strip that you want to make changes to is selected from the scribble strip dropdown. You can press the placeholders to make changes to the Default Name or the Toggle Name. The Default Name is what will be shown in the scribble strip at all times or when the "On" message is sent from a toggle message type. The Toggle Name will be shown on the scribble strip whenever a toggle type message is pressed in the "Off" state. Leave the Toggle Name empty if you do not plan to assign any Toggle Type messages to this preset.
The character limit for scribble strips is 12 characters. 6 characters will fit on one line of the scribble strip and will be centered within the strip. Over 6 characters and the text will automatically adjust the text size to fit within the screen. 7-8 characters drops down one size and 9-12 will drop down to the smallest size.
Pressing the Strip Color button will take you to the following screen where you can select between 9 different colors,

Press Actions
The Unity6 has 8 unique press actions that can be programmed to each preset. Press actions are useful for expanding the capability of each footswitch so you can maximize the functionality of each preset.
The 8 press actions are as follows:
- Press - fires a group of messages immediately upon pressing the switch down
- Release - fires a group of messages upon releasing the switch
- Long Press - fires a group of messages when the switch is pressed and held down for at least 600 milliseconds (just over a half of a second)
- Long Press Release - fires a group of messages when releasing the switch after a Long Press has been executed
- Long Press Scroll - repeatedly fires a group of messages when holding down a switch. Must hold down the switch for 600 milliseconds before the scroll will begin
- Double Tap - fires a group of messages when a switch is pressed two separate times within a 350 millisecond window
- Double Tap Long Press - fires a group of messages when a switch is pressed two separate times within a 350 millisecond window. The second tap must be held down for at least 600 milliseconds before the messages will fire
- Double Tap Long Press Release - fires a group of messages when releasing the switch after a Double Tap Long Press has been executed
Below is a table showing the sequence of actions that will fire Press Actions upon executing various switch press combinations:
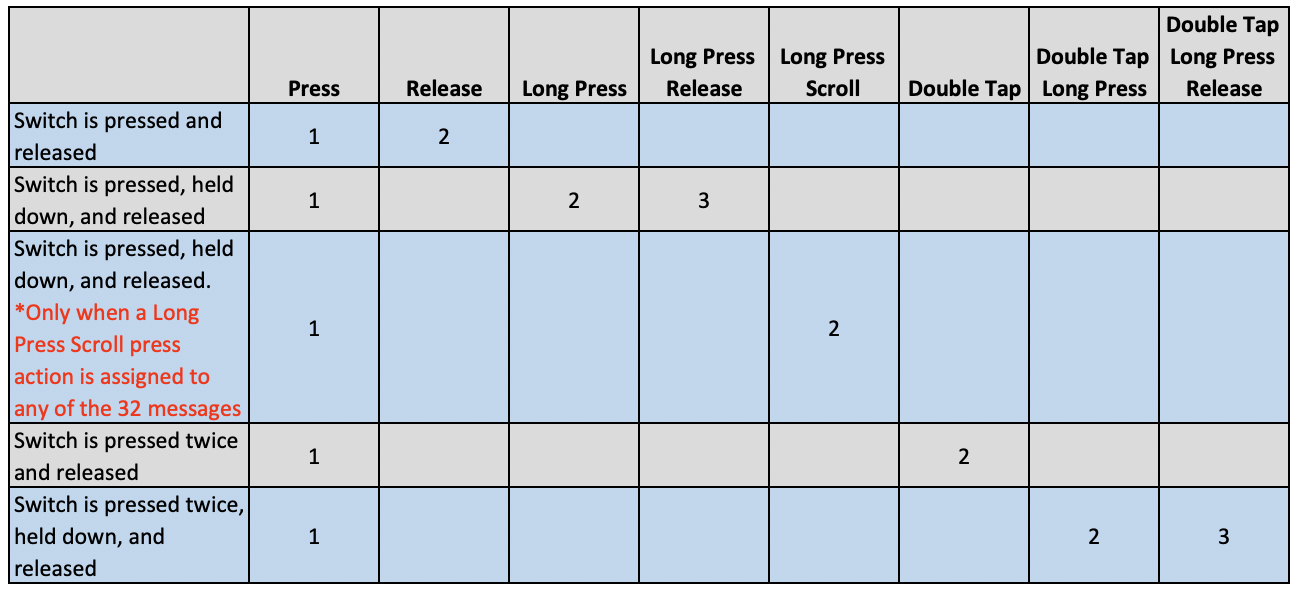
Note that the "Press" action will always execute when pressing down the switch, so it is important to carefully plan your Press Actions within each message so you don't fire unwanted MIDI messages. An example would be assigning MIDI messages to two separate press actions, Long Press and Press. Anything assigned to Press will fire each time you execute the Long Press action. To avoid sending unwanted messages upon pressing the switch, assign MIDI messages to the Release press action instead.
On the other hand, maybe you want a message to fire immediately upon pressing and upon the Long Press Scroll. This comes in handy when scrolling through presets on external pedals. Single taps scroll through presets one at a time but holding the switch down will fast scroll through the presets.
Expression Pedals
To program the expression pedal messages, first go into the menu by pressing the center of the home screen and then press the Programming icon.
Then press the EXP1 or EXP2 icon to access the programming screen for either pedal.
Once inside the programming screen for the expression pedals, you are presented with the options to set the Number, Min Value, and Max Value.
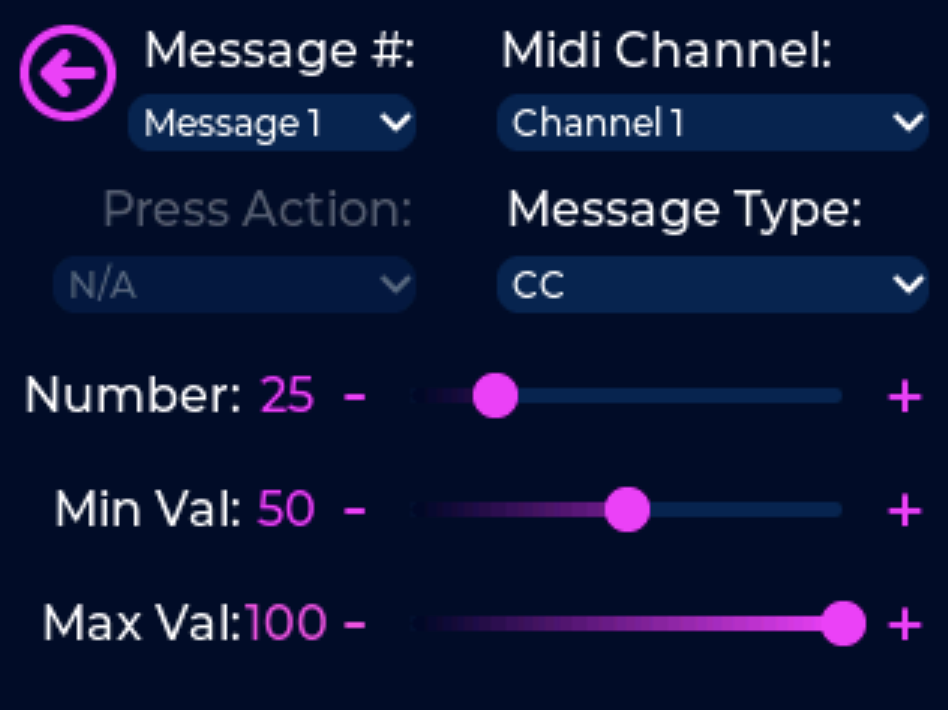
In the example above setting the Min Value to 50 will send CC#25 with a value of 64 (half of 0-127) when the heel is all the way down on the expression pedal. With the toe all the way down it will send CC#25 with a value of 127.
Each expression pedal has up to 8 individual messages it can send simultaneously which can be saved on a per bank basis. Each message can also have its own unique ranges of Min and Max values.
UniPorts
There are 4 UniPorts on the Unity6 and each of them can be assigned to provide various features for controlling external pedals or expanding the features of the Unity6. Below is the list of features and their functions available to the UniPorts:
- Expression Pedal Input
- Connect an expression pedal to the Unity6 to convert expression pedal signals to MIDI messages. Use a ¼" TRS patch cable with any expression pedal that receives information on the Tip and returns information back to the Unity6 on the Ring. *Expression Pedal #1 can only used in UniPort #1 and Expression Pedal #2 can only be used in UniPort #2
- Connect an expression pedal to the Unity6 to convert expression pedal signals to MIDI messages. Use a ¼" TRS patch cable with any expression pedal that receives information on the Tip and returns information back to the Unity6 on the Ring. *Expression Pedal #1 can only used in UniPort #1 and Expression Pedal #2 can only be used in UniPort #2
- MIDI Type A
- The Unity6 can send MIDI messages via the ¼" outputs.
- Connect a ¼" TRS patch cable to any MIDI pedal with a ¼" MIDI input jack. Some pedals that require a MIDI Type A connection are JET Pedals, Jackson Audio, Boss 200 Series, Neunaber Effects, Cooper FX, Swindler Effects.
- MIDI Tip Active
- The Unity6 can send MIDI messages via the ¼" outputs.
- Connect a ¼" TRS patch cable to any MIDI pedal with a ¼" MIDI input jack. Some pedals that require a MIDI Tip Active connection are Strymon, Empress Effects, Meris, Red Panda, Bondi Effects, Alexander Pedals.
- MIDI Ring Active
- The Unity6 can send MIDI messages via the ¼" outputs.
- Connect a ¼" TRS patch cable to any MIDI pedal with a ¼" MIDI input jack. Some pedals that require a MIDI Ring Active connection are Chase Bliss.
- MIDI Type B
- The Unity6 can send MIDI messages via the ¼" outputs.
- Connect a ¼" TRS patch cable to any MIDI pedal with a ¼" MIDI input jack. Some hardware synth's may require a MIDI Type B connection.
* Consult with each manufacturers manual for the correct type of MIDI connection to use
- External Tap
- The Unity6 can send MIDI clock information in the form of tap tempo signals to analog pedals that have a jack for an external tap tempo input. The Unity6 supports any pedal that uses a normally open configuration
- The Unity6 can use all 4 UniPorts each with their own distinct and separate tap divisions. This comes in handy to create dual delays from two separate analog delay pedals and/or to send a separate signal to a tremolo pedal.
- Connect a ¼" TS cable to any pedal with an external tap tempo jack.
- JHS Red Remote
- Connect up to 4 JHS Red Remote enabled pedals to have control over it's Red Remote feature.
- The Unity6 can use all 4 UniPorts to have distinct and separate control for up to 4 JHS pedals at one time.
- Connect a ¼" TS cable to any JHS pedal with an external Red Remote jack.
- Amp Switch
- The Unity6 can control amp channel switching and remote control over an amps external foot switch. The Unity6 supports any amp that uses a normally open configuration to switch channels or foot switches
- The Unity6 can use all 4 UniPorts to have distinct and separate control for up to 4 amp channels and foot switches.
- Connect a ¼" TS cable to any UniPort and the amp switch jack.
Chromatic Tuner
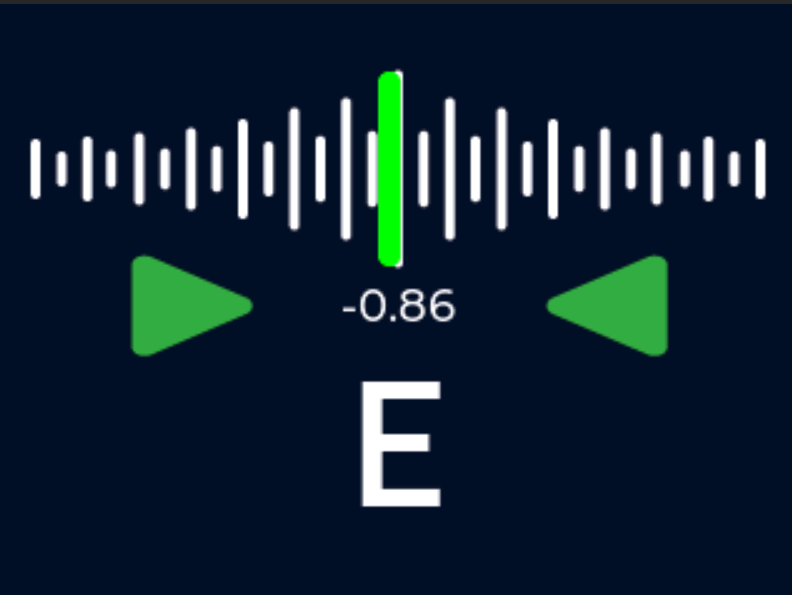
Long press the Tap Switch to activate the Tuner, activating the Tuner will automatically mute your audio signal. Press the Tap Switch to deactivate the Tuner and restore your audio signal.
Expression to Volume
The Unity6 now has the ability to use a single expression pedal to control/send MIDI expression messages AND it can be used as a standard volume pedal. This can be saved on a per bank basis meaning one bank it can be a volume pedal and then jump to a different bank and use it an expression pedal to control parameters like Wah, Phaser, Decay Time, Repeats, etc.
Clicking on either checkbox will make the expression pedal as a volume pedal and it will disable the Exp Pedal control for that Bank.


Copy | Paste | Swap
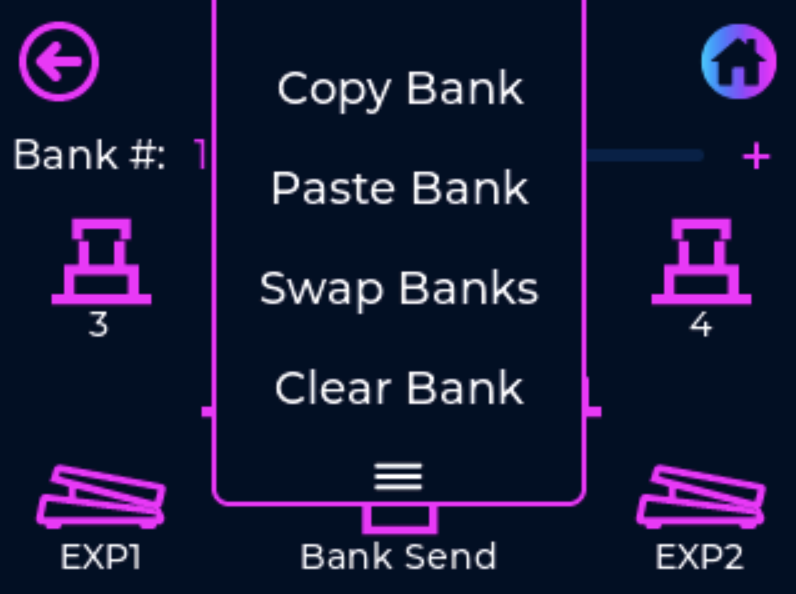
The Unity6 can now copy, paste, or swap whole banks (and individual presets) with a simple click of the BPM knob. Below you can see there is now a little "hamburger menu" at the top of the programming screen.
Copy & Paste a Bank:
- Within the Programming Screen, navigate to the bank you want to copy, this can be done with either touchscreen slider or scrolling with the BPM knob.
- Either press the "hamburger" on the screen or click the BPM knob to dropdown the Copy/Paste/Swap Menu

- Either using the touchscreen, or scrolling and clicking with the BPM Knob, select Copy Bank
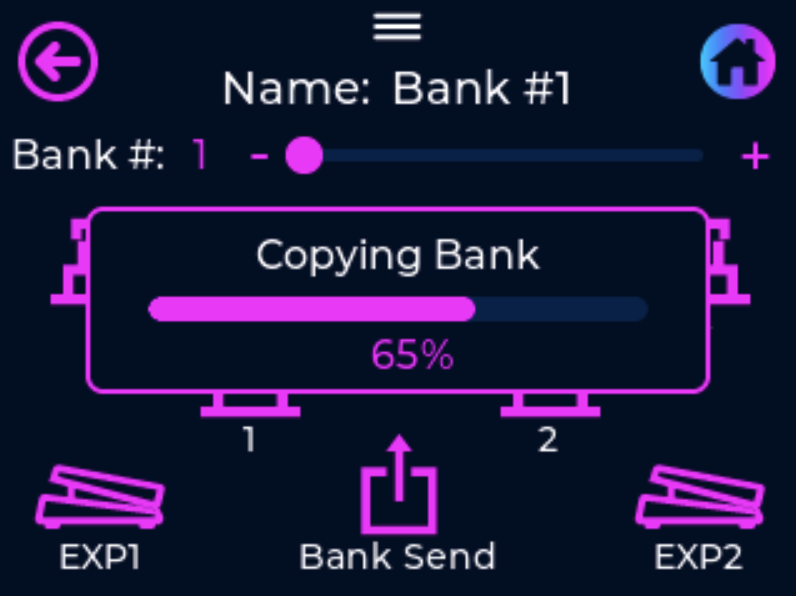
- A pop up window will appear asking you to confirm the Copy action, select yes and then the pedal will show a progress bar executing the Copy action.

- Now navigate to the new bank where you want to paste the copied bank to, using either the touchscreen slider or scrolling with the BPM knob.
- Either press the "hamburger" on the screen or click the BPM knob to dropdown the Copy/Paste/Swap Menu
- Either using the touchscreen, or scrolling and clicking with the BPM Knob, select Paste Bank
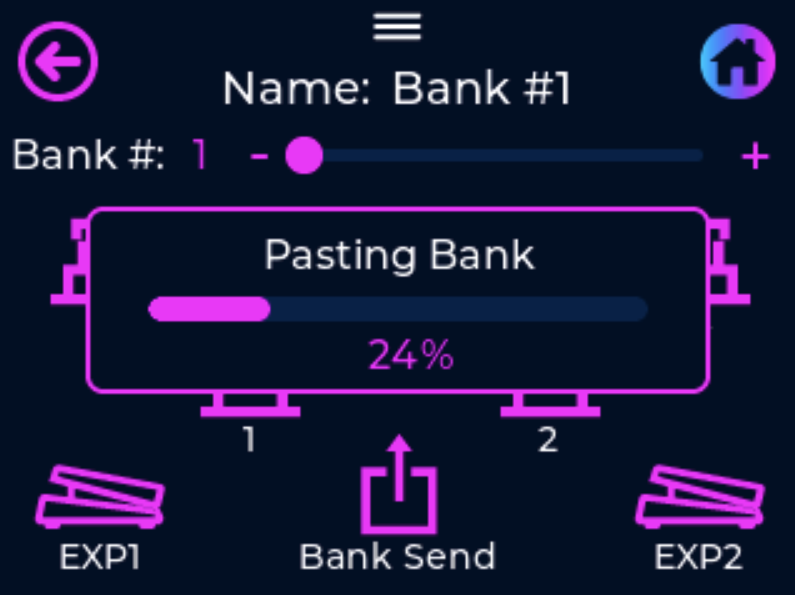
- A pop up window will appear asking you to confirm the Paste action, select yes and then the pedal will show a progress bar executing the Paste action.

Swapping Banks:
- Use the same method shown above to first Copy the Bank
- Using either the touchscreen slider or scrolling with the BPM knob, navigate to the new bank where you want to swap the copied bank with
- Either press the "hamburger" on the screen or click the BPM knob to dropdown the Copy/Paste/Swap Menu
- Either using the touchscreen, or scrolling and clicking with the BPM Knob, select Swap Bank
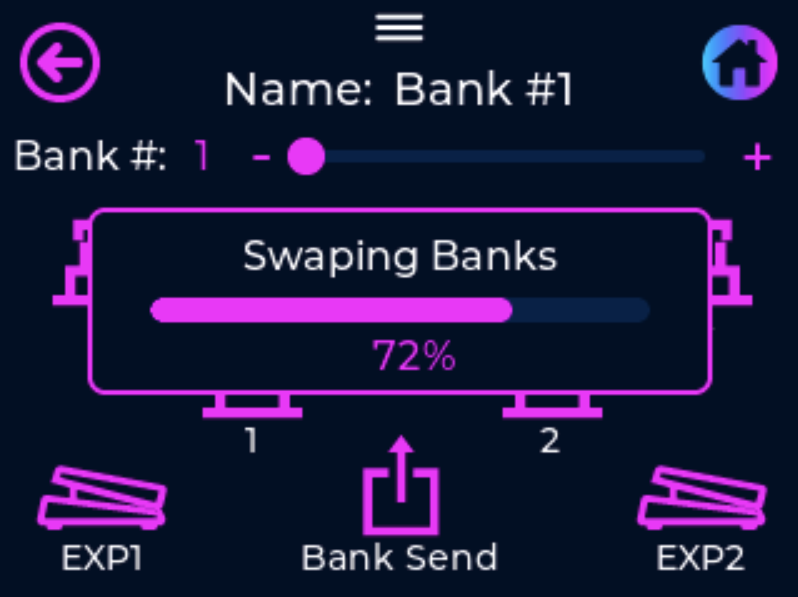
- A pop up window will appear asking you to confirm the Swap action, select yes and then the pedal will show a progress bar executing the Swap action.

Copy/Paste/Swap a Preset:
- This method is similar to copy/paste/swap for a whole bank, however you will find the Copy/Paste/Swap Preset Menu is located within the Preset Programming Screen. As seen below, now there is a "hamburger" menu added to this screen

- Follow the same steps listed above to copy paste or swap a bank
- After copying a preset, navigate to the new preset location you want to paste or swap and select the appropriate message within the Copy/Paste/Swap Preset Menu
- You can paste or swap a preset into any other preset location, even if it is located within a completely different bank
Factory Reset
If you ever run into an issue where the Unity6 gets stuck on the loading screen, or simply want to wipe the pedal back to factory settings. You can hold down switches 1 & 3 upon applying power to the pedal and then follow the onscreen prompts.

Global BPM
Global BPM is a useful feature if you want to jump back and forth between Banks and keep the BPM from changing when each Bank loads. This comes in handy when you use Banks for song presets (with a stored BPM) and then use the individual Presets to jump into different Banks to make MIDI changes to other pedals, loops, JHS Red Remote, etc.
Each Bank can be assigned to use the Global BPM feature within the Programming Menu Screen. Simply click the Global BPM checkbox which will insure this Bank will not update the BPM once it loads.
