U6 Trio
Overview, Features, and how to use the U6 Trio
Overview
Basic features and controls of the U6 Trio
Description
The U6 Trio is a triple switch expander for the Unity6 midi controller/loop switcher. Each switch has two press actions (short press & long press) and each press action can be programmed to control any feature within the Unity6.
Daisy chain up to 2 Trio’s together (per UniPort) to add up to 12 additional switches for the ultimate control over your Unity6.
Each switch and press action can be programmed globally (same feature is accessible across all banks) or each bank can have global overrides programmed to each switch/press action which can be used to fire presets/midi messages within each bank.
Example Use Cases:
- Global Programming (works across all Unity6 banks)
- Short press A, B, C toggle Loops 1, 2, 3 on/off
Long press A, B, C toggle Loops 4, 5, 6 on/off - Short press A, B, C toggle Loops 1, 2, 3 on/off
Long press A bank down
Long press B toggle boost on/off
Long press C bank up - Short press A decrease BPM, short press B toggle amp channel, short press C increase BPM
Long press A bank down
Long press B toggle Red Remote
Long press C bank up
- Short press A, B, C toggle Loops 1, 2, 3 on/off
- Global Override Programming (works only in a specific Unity6 bank)
- Short press A fire any message (or group of messages) assigned to Preset 2 (Switch 2)
Short press B fire any message (or group of messages) assigned to Preset 5 (BPM knob)
Short press C fire any message (or group of messages) assigned to Preset 1 (Switch 1) - (Don’t override Global messages programmed to Long Presses)
Long Press A bank down
Long press B toggle boost
Long press C bank up
- Short press A fire any message (or group of messages) assigned to Preset 2 (Switch 2)
Getting Started
Instructions for connecting the Trio to the Unity6
Connections and Daisy Chaining the Trio
The Trio does not require a power connection, you will only need one patch cable for the Trio. Simply use a standard TRS patch cable, plug one end into the input jack on the Trio and the other end into either UniPort 1 or UniPort 2 of the Unity6.
*UniPorts 3 & 4 will not work with the Trio, make sure you only plug into UniPort 1 or 2.
Up to 2 Trio’s can be daisy chained together per UniPort for more switches and control over your Unity6. Use a standard TRS patch cable and plug one end into the Thru jack of the first Trio (the Trio that is connected to the Unity6) and the other end into the Input jack on the second Trio.
Daisy chaining two Trio’s together per UniPort will give you a total of 12 additional switches that can be added to the Unity6.
Operating the U6 Trio
Press Actions, Global Programming, Global Override
Global Programming
Features that are programmed within the Global Programming menu will control the same feature across all banks. In other words, you program one switch and that specific switch will fire the same feature across all banks within the Unity6.
To access the global programming menu for the Trio, go into the Global Settings screen by tapping the Home Screen on the Unity6 and tap the Global Settings icon. Next tap the Trio icon and you will be brought to the follow screen.
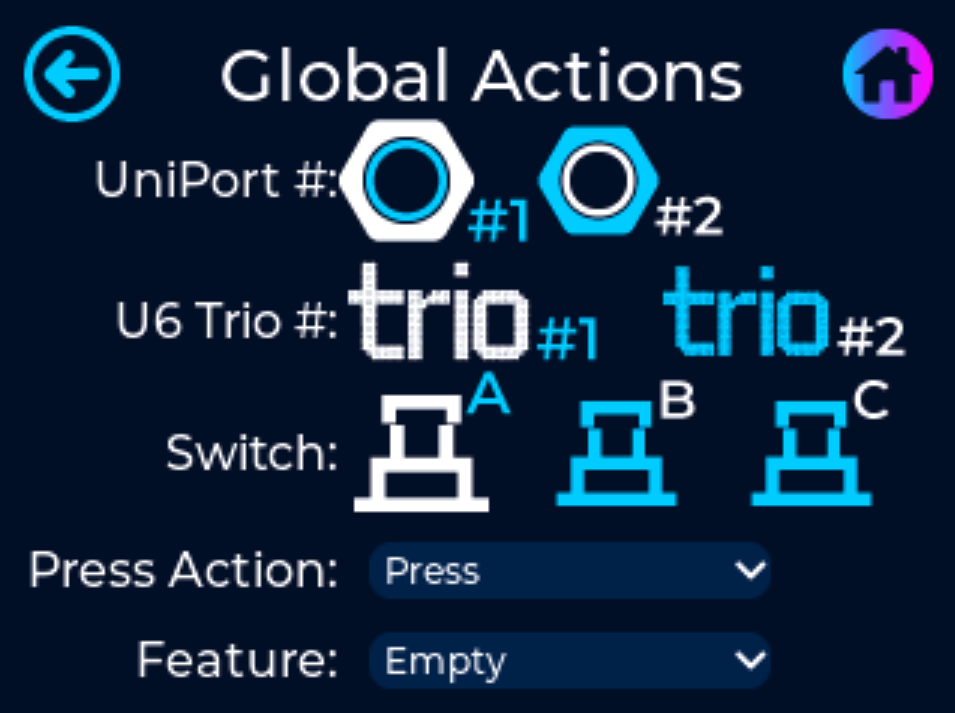
Simply tap the following icons and dropdown menus to bind the programming to the correct UniPort, Trio and Switch.
*UniPort #1, Trio #1, and Switch A, are pre-selected by default.
UniPort #: Select the #1 icon for programming the Trio that is plugged into UniPort #1, or select the #2 icon for programming the Trio that is plugged into UniPort #2.
U6 Trio #: Select the #1 icon for programming the first Trio connected to the UniPort, or select the #2 icon for programming the second Trio that is daisy chained from the first Trio.
Switch: Select the switch you want to program.
Press Action: A “Press” will fire the feature whenever the switch is pressed. A “Long Press” will fire the feature whenever you hold down the switch for longer than a half of a second.
Feature: Select which feature you want to fire whenever the switch is Pressed (or Long Pressed).
*To clear the feature tied to the selected switch, select “Empty” inside the dropdown menu.
To program the next switch on the same Trio, simply select the desired switch icon and select the desired Press Action and Feature.
If you want to program a different switch on a different Trio, simply start the process all over by selecting the appropriate UniPort #, U6 Trio #, Switch, Press Action, and Feature.
Global Override Programming
Actions that are programmed within the Global Override menu are tied to the specific bank for which they are programmed in. If both Global features and Global Override actions are programmed to the same switch, the Global Override takes priority and the Global feature will not fire.
To access the global override programming menu for the Trio, go into the Programming screen by tapping the Home Screen on the Unity6 and tap the Programming icon. Next tap the Trio icon and you will be brought to the following screen.

Simply tap the following icons and dropdown menus to bind the programming to the correct UniPort, Trio and Switch.
*UniPort #1, Trio #1, and Switch A, are pre-selected by default.
UniPort #: Select the #1 icon for programming the Trio that is plugged into UniPort #1, or select the #2 icon for programming the Trio that is plugged into UniPort #2.
U6 Trio #: Select the #1 icon for programming the first Trio connected to the UniPort, or select the #2 icon for programming the second Trio that is daisy chained from the first Trio.
Switch: Select the switch you want to program.
Press Action: A “Press” will fire the feature whenever the switch is pressed. A “Long Press” will fire the feature whenever you hold down the switch for longer than a half of a second.
Preset #: Select which preset you want to fire whenever the switch is Pressed (or Long Pressed). A preset can also be considered a Unity6 switch so the dropdown list shows a value between 1-5. 1, 2, 3, & 4 are switches 1-4 and 5 is the BPM knob/switch
Action: Select the desired item to fire the message or group of messages that have been programmed to this Unity6 Preset & Press Action.
*To clear the action tied to the selected switch, select “Empty” inside the dropdown menu.
To program the next switch on the same Trio, simply select the desired switch icon and select the desired Press Action, Preset, and Action.
If you want to program a different switch on a different Trio, simply start the process all over by selecting the appropriate UniPort #, U6 Trio #, Switch, Press Action, Preset #, and Action.
FAQ
Frequently asked questions
How Many Features Can I Control w/ the Trio?
The Trio can have two features assigned to each switch, one feature assigned to its Press action and another to its Long Press action. Giving you access to a total of 6 different features per Trio. A total of 4 Trio's can be connected to the Unity6 giving you 12 switches with a total 24 different features available at one time.
These features can be accessed globally across all Unity6 banks, or you can assign Global Overrides to individual switches inside each Unity6 bank. Global Override commands can be programmed to do different things on a per bank basis giving you the ultimate control over your Unity6!
How Many Trio's Can I Plug Into the Unity6?
You can plug the Trio into either UniPort 1 and/or UniPort 2 and also daisy chain two Trio's together per UniPort. This will give you 4 Trio's all together with a total of 12 extra footswitches that can be added to the Unity6.
Does the Trio Require a Power Connection?
No, you only need a standard ¼" TRS patch cable to connect and communicate with the Unity6.
Does the Trio Work with Any Other Pedal?
No. The Trio has been specifically designed to work with the Unity6.